
 Latest images
Darn Near Free Photo Tent
![]()
 Darn Near Free Photo Tent
![]() Guest Wed Dec 05, 2012 2:43 pm
Guest Wed Dec 05, 2012 2:43 pm
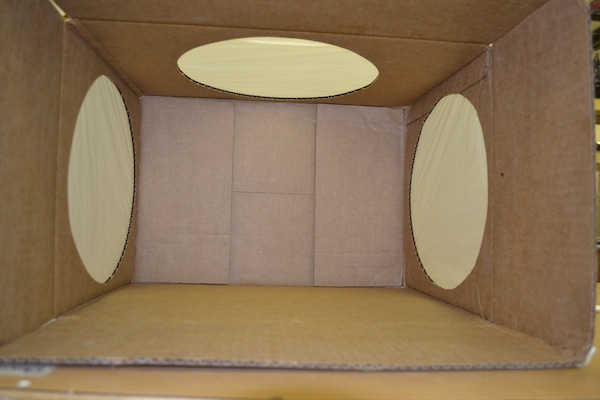
Start with rounding up your materials.
1. A cardboard Box, bigger is better
2. A white garbage bag
3. Scissors
4. Tape
5. A round plate smaller than the side of your box.
6. An exacto knife
7. A pen

Guest- Guest
![]()
![]()
Re: Darn Near Free Photo Tent
![]() Guest Wed Dec 05, 2012 2:45 pm
Guest Wed Dec 05, 2012 2:45 pm


Guest- Guest
![]()
![]()
Re: Darn Near Free Photo Tent
![]() Guest Wed Dec 05, 2012 2:46 pm
Guest Wed Dec 05, 2012 2:46 pm

Guest- Guest
![]()
![]()
Re: Darn Near Free Photo Tent
![]() Guest Wed Dec 05, 2012 2:47 pm
Guest Wed Dec 05, 2012 2:47 pm

Guest- Guest
![]()
![]()
Re: Darn Near Free Photo Tent
![]() Guest Wed Dec 05, 2012 2:47 pm
Guest Wed Dec 05, 2012 2:47 pm

Guest- Guest
![]()
![]()
Re: Darn Near Free Photo Tent
![]() Guest Wed Dec 05, 2012 2:48 pm
Guest Wed Dec 05, 2012 2:48 pm
Guest- Guest
![]()
![]()
Re: Darn Near Free Photo Tent
![]() Guest Wed Dec 05, 2012 2:49 pm
Guest Wed Dec 05, 2012 2:49 pm

Guest- Guest
![]()
![]()
Re: Darn Near Free Photo Tent
![]() Guest Wed Dec 05, 2012 2:50 pm
Guest Wed Dec 05, 2012 2:50 pm
Guest- Guest
![]()
![]()
Re: Darn Near Free Photo Tent
![]() Guest Wed Dec 05, 2012 2:52 pm
Guest Wed Dec 05, 2012 2:52 pm
Guest- Guest
![]()
![]()
Re: Darn Near Free Photo Tent
![]() Guest Wed Dec 05, 2012 2:56 pm
Guest Wed Dec 05, 2012 2:56 pm
1. Your material over the holes should be translucent. You want the light to pass through, but you want to difuse it. The purpose of a light box is to cut down on shadows and glare. Too opaque and you have too dark of photos, too transparent and you defeat the purpose.
2. Pick a non-reflective background paper. It will work out better. You don't want lots of reflections within the box. While they can occasionally give you great effects, more often then not, they just screw up the shot.
3. Bigger is better. Don't try to cram your pieces into a small space. Give them room to breath and the light to mellow.
4. Round up a few different colored drops. Some things look better against different colors.
5. Learn how to use your camera. The camera is a great tool, but you are the one who takes the picture. Not the other way around.
I hope this helps, happy shooting.
Sean
Guest- Guest
![]()
![]()
Re: Darn Near Free Photo Tent
![]() Guest Wed Dec 05, 2012 8:18 pm
Guest Wed Dec 05, 2012 8:18 pm
Guest- Guest
![]()
![]()
Guest- Guest
![]()
![]()
Re: Darn Near Free Photo Tent
![]() Guest Wed Dec 05, 2012 9:18 pm
Guest Wed Dec 05, 2012 9:18 pm
Guest- Guest
![]()
![]()
Re: Darn Near Free Photo Tent
![]() Guest Wed Dec 05, 2012 9:21 pm
Guest Wed Dec 05, 2012 9:21 pm
Guest- Guest
![]()
![]()
Re: Darn Near Free Photo Tent
![]() Guest Wed Dec 05, 2012 9:58 pm
Guest Wed Dec 05, 2012 9:58 pm
Thanks for the sweet tut Asp. Only problem i see with photo tent is space. My room is already cluttered enough as it is, where the hell am I gonna put it? Ah well, if it makes my customs look better, I'll find somewhere for it!
Guest- Guest
![]()
![]()
Re: Darn Near Free Photo Tent
![]() Guest Wed Dec 05, 2012 10:48 pm
Guest Wed Dec 05, 2012 10:48 pm
Guest- Guest
![]()
![]()
Re: Darn Near Free Photo Tent
![]() Guest Thu Dec 06, 2012 12:41 am
Guest Thu Dec 06, 2012 12:41 am
Guest- Guest
![]()
![]()
Re: Darn Near Free Photo Tent
![]() Guest Thu Dec 06, 2012 12:53 am
Guest Thu Dec 06, 2012 12:53 am
Didn't use garbage bag last time. Maybe my material wasn't translucent enough.
Guest- Guest
![]()
![]()
Re: Darn Near Free Photo Tent
![]() Guest Thu Dec 06, 2012 7:49 am
Guest Thu Dec 06, 2012 7:49 am
Guest- Guest
![]()
![]()
Re: Darn Near Free Photo Tent
![]() Guest Thu Dec 06, 2012 7:50 am
Guest Thu Dec 06, 2012 7:50 am
Guest- Guest
![]()
![]()
Re: Darn Near Free Photo Tent
![]() Guest Mon Jul 15, 2013 2:21 pm
Guest Mon Jul 15, 2013 2:21 pm
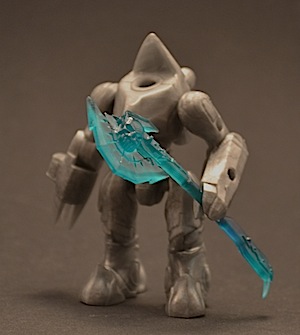
This seems like a great design for single-figure shots for showing off or for eBay. I really like how much it cancels out shadows
BTW, if anyone needs actual diffuser film, LMK - I can get some for $1/sheet, but that doesn't include shipping.
Guest- Guest
![]()
![]()
Re: Darn Near Free Photo Tent
![]() Guest Tue Jul 16, 2013 10:46 am
Guest Tue Jul 16, 2013 10:46 am
Guest- Guest
![]()
![]()
Re: Darn Near Free Photo Tent
![]() Guest Wed Jul 24, 2013 10:33 pm
Guest Wed Jul 24, 2013 10:33 pm
Guest- Guest
![]()
![]()
Re: Darn Near Free Photo Tent
![]() Guest Fri Jul 26, 2013 10:46 pm
Guest Fri Jul 26, 2013 10:46 pm
Guest- Guest
![]()
![]()
![]()
|
|
|